Authentication
The Library > Authentication page allows you to set up authentication servers and create authentication rules with options for client-side Basic or Forms and server-side NTLM or BASIC.
Setting up Authentication – A Workflow
Please carry out the following steps as a minimum to apply Authentication to your service.
1. Create an Authentication Server.
2. Create an Authentication Rule that uses an Authentication Server.
3. Create a flightPATH rule that uses an Authentication Rule.
4. Apply the flightPATH rule to a Service
Authentication Servers
To set up a working authentication method, we must first set up an authentication server.
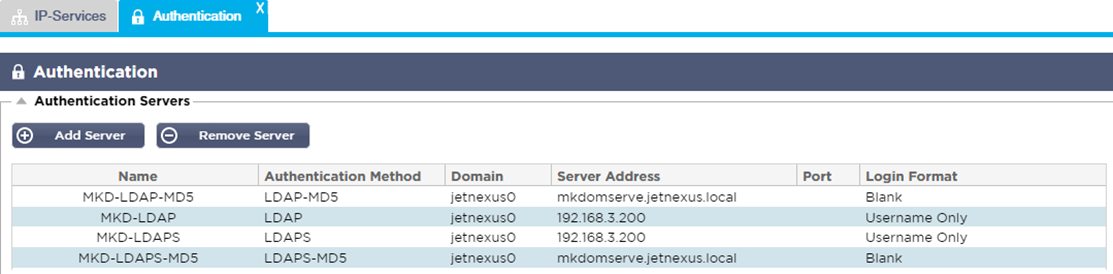
· Click the Add Server button.
· This action will produce a blank row ready for completion.
|
Option
|
Description
|
|
Name
|
Give your server a name for identification purposes – this name is used in the rules
|
|
Description
|
Add a description
|
|
Authentication Method
|
Choose an authentication method
LDAP – basic LDAP with usernames and passwords sent in clear text to the LDAP server.
LDAP-MD5 – basic LDAP with username in clear text and password MD5 hashed for increased security.
LDAPS – LDAP over SSL. Sends the password in clear text within an encrypted tunnel between the ADC and LDAP server.
LDAPS-MD5 – LDAP over SSL. The password is MD5 hashed for added security within an encrypted tunnel between the ADC and the LDAP server
|
|
Domain
|
Add in the domain name for the LDAP server.
|
|
Server Address
|
Add the IP address or hostname of the authentication server
LDAP – IPv4 address or hostname.
LDAP-MD5 – hostname only (IPv4 address will not work)
LDAPS – IPv4 address or hostname.
LDAPS-MD5 – hostname only (IPv4 address will not work).
|
|
Port
|
Use port 389 for LDAP and port 636 for LDAPS by default. No need to add the port number for LDAP and LDAPS. When other methods become available, you will be able to configure them here
|
|
Search Conditions
|
Search conditions must conform to RFC 4515. Example:
(MemberOf=CN=Phone- VPN,CN=Users,DC=mycompany,DC=local).
|
|
Search Base
|
This value is the starting point for the search in the LDAP database.
Example dc=mycompany,dc=local
|
|
Login Format
|
Use the login format you need.
Username – with this format chosen, you need only enter the username. Any user and domain information entered by the user is deleted, and the domain information from the server is used.
Username and Domain – The user must enter the whole domain and username syntax. Example: mycompany\gchristie OR someone@mycompany. The domain information entered at the server level is ignored.
Blank – the ADC will accept anything the user inputs and send it on to the authentication server. This option is used when using MD5.
|
|
Passphrase
|
This option is not used in this version.
|
|
Dead Time
|
Not used in this version
|
Authentication Rules
The next stage is to create the authentication rules for use with the server definition.

|
Field
|
Description
|
|
Name
|
Add a suitable name for your authentication rule.
|
|
Description
|
Add a suitable description.
|
|
Root Domain
|
This must be left blank unless you need single-sign-on across sub-domains.
|
|
Authentication Server
|
This is a dropdown box containing servers that you have configured.
|
|
Client Authentication:
|
Choose the value appropriate to your needs:
Basic (401) – This method uses the standard 401 authentication method
Forms – this will present the ADC default form to the user. Within the form, you can add a message. You can select a form that you have uploaded using the section below.
|
|
Server Authentication
|
Choose the appropriate value.
None – if your server does not have any existing authentication, select this setting. This setting means that you can add authentication abilities to a server that previously had none.
Basic – if your server has basic authentication (401) enabled, then select BASIC.
NTLM – if your server has NTLM authentication enabled, then select NTLM.
|
|
Form
|
Choose the appropriate value
Default – Selecting this option will result in the ADC using its built-in form.
Custom – you can add a form that you have designed and select it here.
|
|
Message
|
Add a personal message to the form.
|
|
Timeout
|
Add a timeout to the rule, after which the user will be required to authenticate again. Note the Timeout setting is only valid for Forms-based authentication.
|
Single Sign-On

If you wish to provide a single sign-on for users, complete the Root Domain column with your domain. In this example, we have used edgenexus.io. We can now have multiple services that will use edgenexus.io as the root domain, and you will only have to log in once. If we consider the following services:
· Sharepoint.mycompany.com
· usercentral.mycompany.com
· appstore.mycompany.com
These services can reside on one VIP or can be distributed across 3 VIPs. A user accessing usercentral.mycompany.com for the first time will be presented with a form asking them to log in depending on the authentication rule used. The same user can then connect to appstore.mycompany.com and will be authenticated automatically by the ADC. You can set the timeout, which will force authentication once this period of inactivity has been reached.
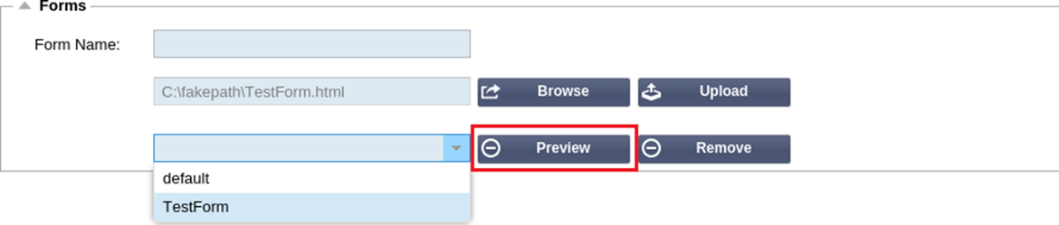
Forms
This section will enable you to upload a custom form.
How to create your custom form
Although the basic form the ADC provides is sufficient for most purposes, there will be occasions where companies wish to present their own identity to the user. You can create your custom form that users will be presented with to fill in in such cases. This form must be in either HTM or HTML format.
|
Option
|
Description
|
|
Name
|
form name = loginform
action = %JNURL%
Method = POST
|
|
Username
|
Syntax: name = “JNUSER”
|
|
Password:
|
name=”JNPASS”
|
|
Optional Message1:
|
%JNMESSAGE%
|
|
Optional Message2:
|
%JNAUTHMESSAGE%
|
|
Images
|
If you wish to add an image, then please add it in-line using Base64 encoding.
|
Example html code of a very basic and simple form
<HTML>
<HEAD>
<TITLE>SAMPLE AUTH FORM</TITLE>
</HEAD>
<BODY>
%JNMESSAGE%<br>
<form name=”loginform” action=”%JNURL%” method=”post“> USER: <input type=”text” name=”JNUSER” size=”20” value=””></br>
PASS: <input type=”password” name=”JNPASS” size=”20” value=””></br>
<input type=”submit” name=”submit” value=”OK“>
</form>
</BODY>
</HTML>
Adding a custom form
Once you have created a custom form, you can add it using the Forms section.

1. Choose a name for your form
2. Browse locally for your form
3. Click Upload
Previewing your custom form
To view the custom form that you have just uploaded, you select it and click Preview. You may also use this section to delete forms that are no longer required.