17. Navigate to Services > IP Services using the left-side navigation panel.
18. The IP Services panel will be shown on the right side.
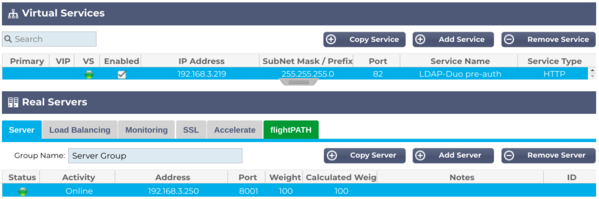
19. The IP Services panel consists of 2 main sections: Virtual Services and Real Servers.
20. Click the Add Service button in the Virtual Services section. Fill in the details that are relevant to your network infrastructure. We have highlighted the areas you need to specify in GREEN. Remember to set the Service Type as HTTP.
Field
Description
Primary/Mode
An auto-populated field that indicates whether the VIP is Active, In Drain, or Disabled
VIP
A visual indicator that displays in a variety of colors to show the status of the VIP. See Admin Guide.
VS
A visual indicator that displays in a variety of colors to show the status of the VS. See Admin Guide.
Enabled
A checkbox used to enable or disable the VIP/VS
IP Address
The IP address that users will use to access the software – Please add the IP address you are going to use
Subnet Mask/Prefix
The relevant and applicable subnet mask for your network segment
Port
The Port that the users will specify in the URL (in our example, we are using 82)
Service Name
A short name for the VIP/VS
Service Type
This drop-down should be set to HTTPas we are going to use a flightPATH rule
Now we will start configuring the Real Servers section.