
Microsoft Hyper-V
The Edgenexus ADC Virtual appliance can be easily installed within a Microsoft Hyper-V virtualization framework. This guide assumes you have correctly specified and configured your Hyper-V system and system resources to accommodate the ADC and its load balancing architecture.
Note each appliance requires a unique MAC address.
· Extract the downloaded Hyper-V compatible ADC-VA file to your local machine or server.
· Open Hyper-V Manager.
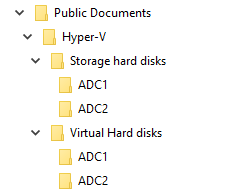
· Create a new folder to contain the ADC VA ‘Virtual hard disk’ and another new folder to contain the ‘Storage hard disk,’ e.g., C:\Users\Public\Documents\Hyper-V\Virtual hard disks\ADC1 and C:\Users\Public\Documents\Hyper-V\Storage hard disks\ADC1
· Note: New ADC specific subfolders for the Virtual hard disks\ and Storage hard disks\ need to be created for each virtual ADC instance installation, as shown below:
· Copy the extracted EdgeADC .vhd file to the ‘Storage hard disk’ folder created above.
· In your Hyper-V Manager client, right-click on the server and select "Import Virtual Machine"
· Browse to the folder containing the downloaded ADC VA image file extracted earlier
· Select Virtual Machine - highlight the virtual machine to import and click Next
· Select Virtual Machine - highlight the virtual machine to import and click Next
· Choose Import Type - select “Copy the virtual machine (create a new unique ID)” click next
· Choose Folders for Virtual Machine Files - the Destination can be left as the Hyper-V default or you can choose to select a different location
· Locate Virtual Hard Disks – browse to and select the virtual hard disks folder created above and click next
· Choose Folders to Store Virtual Hard Disks – browse to and select the Storage hard disks folder created previously and click next
· Verify the details in the Completing Import Wizard Summary window are correct and click Finish
· Right-click on the newly imported ADC virtual machine and select Start
Note: as per http://support.microsoft.com/kb/2956569 you should ignore the “Degraded (Integration services upgrade required)” status message, which may be displayed as below after the VA is started. No action is required, and the service is not degraded
· While the VM is initializing, you can right-click on the VM entry and select Connect…You will then be presented with the EdgeADC console.
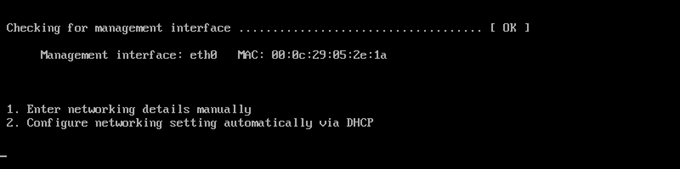
· Once you configure the network properties, the VA will reboot and present the logon to the VA console.
Please refer to the section First Boot Configuration to proceed further.