
SSL Certificates
To successfully use Layer 7 load-balancing with servers using encrypted connections using SSL, the ADC must be equipped with the SSL certificates used on the target servers. This requirement is so that the data stream can be decrypted, examined, managed, and then re-encrypted before sending to the target server.
The SSL certificates can range from self-signed certificates that the ADC can generate to the traditional certificates (wildcard included) available from trusted providers. You can also use domain signed certificates that are generated from Active Directory.
What does the ADC do with the SSL Certificate?
The ADC can perform traffic management rules (flightPATH) depending on what the data contains. This management cannot be performed on SSL encrypted data. When the ADC has to inspect the data, it needs first to decrypt it, and for that, it needs to have the SSL certificate used by the server. Once decrypted, the ADC will then be able to examine and perform the flightPATH rules. Following this, the data will be re-encrypted using the SSL certificate and sent onto the final Real Server.
Create Certificate
Although the ADC can use a globally trusted SSL certificate, it can generate a Self-Signed SSL Certificate. The Self-Signed SSL is perfect for internal load balancing requirements. However, your IT policies may require a trusted or domain CA certificate.
How to Create a Local SSL certificate
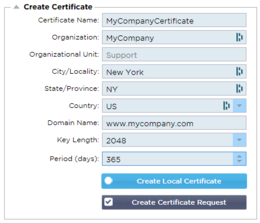
· Fill in all the details like the example above
· Click on Create Local Certificate
· Once you have clicked this, you can apply the certificate to a Virtual Service.
Create a Certificate Request (CSR)
When you need to obtain a globally trusted SSL from an external provider, you will need to generate a CSR to generate the SSL certificate.
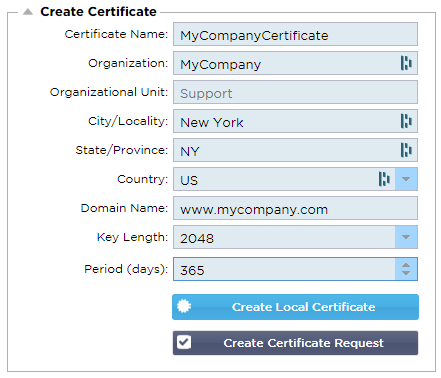
Fill in the form as shown above with all relevant data, and then click the Certificate Request button. You will be presented with the popup corresponding to the data you provided.
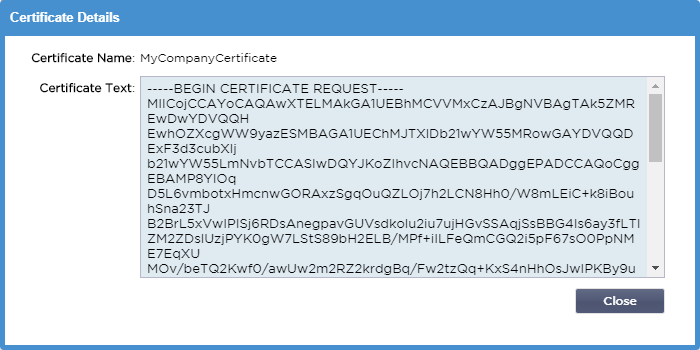
You will need to cut and paste the contents into a TEXT file and name it with a CSR file extension, for example, mycert.csr. This CSR file will then need to be provided to your certificate authority to create the SSL certificate.
Manage Certificate
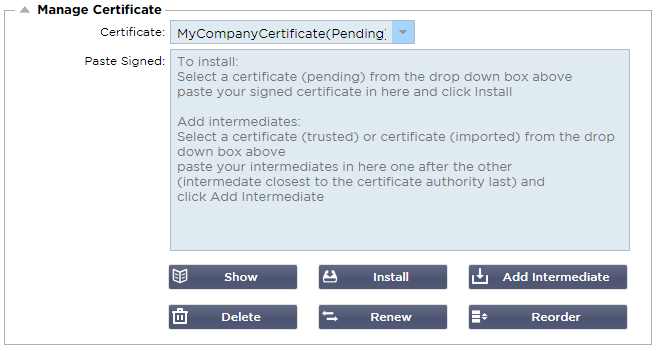
This sub-section contains various tools to allow management of the SSL certificates you have within the ADC.
Show
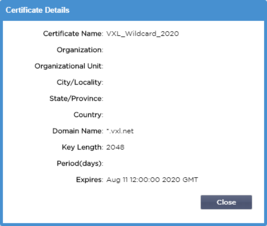
There may be times when you wish to look at the details of an installed SSL certificate.
· Select the certificate from the drop-down menu
· Click on the Show button
· The popup shown below will be presented with the details of the certificate.
Installing a Certificate
Once you obtain the certificate from the Trusted Certificate Authority, you will need to match it to the CSR generated and install it within the ADC.
· Select a certificate that you have generated in the steps above. There will be a (Pending) status fixed to the line item. In the example, MyCompanyCertificate is shown in the image above.
· Open the certificate file in a text editor
· Copy the entire contents of the file to the clipboard
· Paste the contents of the signed SSL certificate you received from the trusted authority into the field marked Paste Signed.
· You may also paste in the Intermediates below this, taking care to follow the correct order:
1. (TOP) Your Signed Certificate
2. (2nd From Top) Intermediate 1
3. (3rd from Top) Intermediate 2
4. (Bottom) Intermediate 3
5. Root Certificate Authority No need to add this as they exist on the client machines.
(the ADC also contains a root bundle for re-encryption where it acts as a client to a Real Server)
· Click Install
· Once you have installed the certificate, you should see the status (Trusted) next to your certificate
If you have made a mistake or entered the wrong intermediate order, then select the Certificate (Trusted) and add the certificates (including the signed certificate) again in the correct order and click Install
Add Intermediate
It is required on occasion to add intermediate certificates separately. For example, you may have imported a certificate that does not have the intermediates.
· Highlight a Certificate (trusted) or certificate (imported)
· Paste the intermediates one below the other taking care that the intermediate closest to the Certificate authority is pasted last.
· Click Add Intermediate.
If you make a mistake with the order, you can repeat the process and add the intermediates again. This action will only overwrite the previous intermediates.
Delete a Certificate
You can delete a certificate using the Delete button. Once deleted, the certificate will be removed entirely from the ADC and will need to be replaced, then reapplied to the Virtual Services if required again.
Note: Please make sure that the certificate is not attached to an operational VIP before deleting it.
Renew a certificate
The Renew button allows you to obtain a new Certificate Signing Request. This action is required when the certificate is due to expire and needs to be renewed.
· Select a certificate from the drop-down list; you may choose any certificate with the (Pending), (Trusted), or (Imported) status
· Click Renew
· Copy the new CSR details so you can obtain a new certificate
· When you obtain the new certificate, follow the steps detailed in Show
·
· There may be times when you wish to look at the details of an installed SSL certificate.
· Select the certificate from the drop-down menu
· Click on the Show button
· The popup shown below will be presented with the details of the certificate.
· Installing a Certificate.
· The new and renewed certificate will now be installed into the ADC.
Importing a Certificate
In many cases, corporate enterprises will need to use their domain-signed certificates as part of their internal security regimes. The certificates must be in PKCS#12 format, and passwords invariably protect such certificates.
The image below shows the sub-section for importing a single SSL certificate.
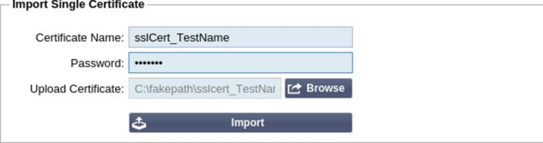
· Give your certificate a friendly name. The name identifies it in the drop-down lists used in the ADC. It does not need to be the same as the certificate domain name but must be alphanumeric with no spaces. No special characters other than _ and – are allowed.
· Type the password you used to create the PKCS#12 certificate
· Browse for the {certificate name}.pfx
· Click Import.
· Your certificate will now be in the relevant SSL drop-down menus within the ADC
Importing Multiple Certificates
This section allows you to import a JNBK file that contains multiple certificates. A JNBK file is encrypted and produced by ADC when exporting multiple certificates.
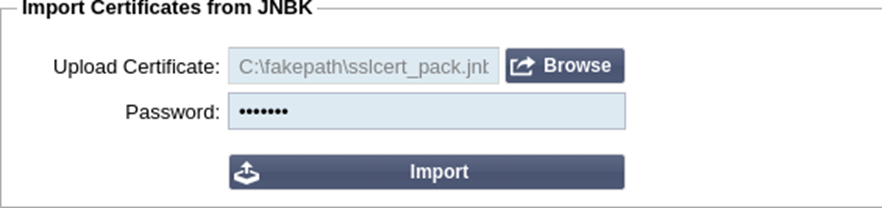
· Browse for your JNBK file – you can create one of these by exporting multiple certificates
· Type the password you used to create the JNBK file
· Click Import.
· Your certificates will now be in the relevant SSL drop-down menus within the ADC
Exporting a Certificate
From time to time, you may wish to export one of the certificates held within the ADC. The ADC has been provided with the capability to do this.
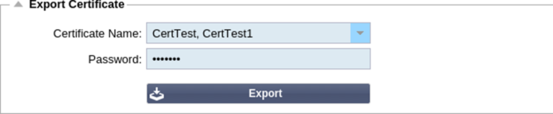
· Click the certificate or certificates you wish to install. You may all click the All option to select all the listed certificates.
· Type a password to protect the exported file. The password must be at least six characters in length. Letters, numbers, and certain symbols can be used. The following characters are not acceptable: < > ” ‘ ( ) ; \ | \A3 % &
· Click Export
· Where you are exporting a single certificate, the resulting file will be named sslcert_{certname}.pfx. For example sslcert_Test1Cert.pfx
· In the case of a multi-certificate export, the resulting file will be a JNBK file. The filename will be sslcert__pack.jnbk.
Note: A JNBK file is an encrypted container file produced by the ADC and valid only for import into the ADC